The Pearly Story Behind "Dusting in Pearls"


I always feel like a walking paradox. I can get out in the garden with my shovel and sledgehammer and love every dusty dirty minute I'm out there. I spend the majority of my life dressed in my "grubbies". Yet there's a part of me deep down inside that still likes "the frillies", "the pearlies", and "the sparklies"--all the pretty things. Maybe it's all the great classic Hollywood movies I watched as a kid. I don't know. All I know is that I can be dirty and sweaty and still want to put on heels when it isn't practical; buy the prettiest apron even if it will get dirty; and don pearls when all I'm going to be doing is dusting and vacuuming the house. It doesn't make sense. It doesn't have to. I've decided to claim it, celebrate it, and have fun with it... and create some "pearly" goodness along the way.

Tuesday, December 22, 2009

Print-Your-Own Gift Tags

Do you have the same problem I do every year? I get around to wrapping all my Christmas gifts and then realize I don't have enough gift tags. Or I don't like the ones I have on hand. Well, if you're feeling a little creative and need a solution to the same problem, here it is!

Featuring my own original watercolor illustration "Santa's Sleigh", this print-your-own PDF file lets you enjoy creating something while you're enjoying the spirit of giving at Christmas. And it's only 50 cents!

Print as many as you wish (for your personal use) on your own printer, on the paper you want, and even embellish them to your heart's content!

Delivered in a digital PDF file that you print. When you purchase this item, a download file will be made available to you IMMEDIATELY after you checkout. You will need a free copy of Adobe Reader to view and print the file, but that's it! This file is compatible with every computer and doesn't need any special software to use.

The high-resolution full-color PDF file prints on 8.5"x11" with three large 4.75"W x 2.75"H gift tags on each page you print. Instructions and fun ideas are included on each page you print too. Once you've printed, simply cut around the dotted lines, and you have three gift tags!


Friday, December 18, 2009

Take-Out Twinkler

Since November 2009, I've had the pleasure of being a part of a design team designing projects for Aqua-Gems using their products--Aqua Gems Liquid Marbles and BrightSPOT Submersible LED Accent Lights. I've been given permission to share my craft designs here on my blog. To see all craft designs I've featured, click on the label "craft design" at the end of this post.

Click on image to view larger


This project is so fun to make because it's really easy and very inexpensive. It's a versatile project that has a lot of possible applications (see "Ideas" section below).

Materials:
  • 1 translucent plastic take-out container (Dollar Tree has this pre-decorated one or you could buy a plain on and draw your design on with Sharpie markers)
  • 3 BrightSPOT submersible LED accent lights (I used blue, red and pink)
  • Aqua Gems (I used clear)
Directions:
  1. Put a 1 inch layer of Aqua Gems in the bottom of take-out container
  2. Set one BrightSPOT on top of Aqua Gems with bulb facing out about 1/2 inch to 3/4 inch in from sides of container
  3. Put another 1-2 inch layer of Aqua Gems burying light
  4. Set one BrightSPOT on top of second layer of Aqua Gems on opposite side than first BrightSPOT
  5. Put another 1-2 inch layer of Aqua Gems in burying light
  6. Set last BrightSPOT on top of third layer in line with first
  7. Fill container full with Aqua Gems burying last light
  8. Close flaps of container and your done!
Ideas:
  • String together multiple Take-Out Twinklers as a lighted “garland” and hang for a party
  • Place multiple Take-Out Twinklers along a walkway leading up to the door to welcome guests to a nighttime party
  • Tie helium-filled balloons to handle and use as a centerpiece on a table or make multiple ones for a larger room with many tables
  • Jazz up the top by putting the stem of a single big showy flower through the small space in the top between the flaps. The Aqua Gems will keep it hydrated. A gerbera daisy would look great.
Click here to visit the Aqua Gems website for more information
or to buy Aqua Gems Liquid Marbles
and BrightSPOT Submersible LED Accent Lights for this project


Disclosure: I was paid to design the featured project. I AM NOT being paid to feature this project or product(s) on my blog and WILL NOT receive compensation for clicks through to the company website featuring the product(s)

Thursday, December 3, 2009

Dancing Dear Abigail Girl


After finishing up the design work on the Dear Abigail Girl for DearAbigail.net, Abby wanted me to come up with an excited dancing version of our little gal. She wanted to pair the art with one of her favorite Marilyn Monroe quotes so she could use it as a Facebook button.

Here's the exciting news...

Abby wants this art to be available to anyone that wants to buy it for only $0.99 at the Rosehaven Cottage Digital Download Shop (click here to download it). It is also available without the DearAbigail.net lettering at the bottom (click here to download that version).

I can also add custom lettering to the bottom if you drop me a note at dustinginpearls at yahoo dot com with a special request--and it will still cost only $0.99.

Friday, November 20, 2009

Dear Abigail Girl


Over the past few weeks, I've had the privilege of working with Abigail at Dear Abigail to design and illustrate the "Dear Abigail Girl" to appear on a sidebar button on Abigail's newly burgeoning website for girls. Abigail had a great vision and articulated it so clearly. She wanted a curly-haired girl playing dress-up in colors that coordinated with her website's color palette. Because Abigail's website looks like a bulletin board, she wanted the illustration to look like it was taped up to the "bulletin board". So I was able to create that for her too. The Dear Abigail Girl is now being incorporated into the website by Abigail's coders and should make her debut soon.

Click here to visit Dear Abigail

Wednesday, November 18, 2009

Lighted Kissing Ball

Click image above to view larger

The above arrangement is another of the design projects I've been working on for Aqua-Gems using their products--Aqua Gems Liquid Marbles and BrightSPOT Submersible LED Accent Lights.

I've named this design "Lighted Kissing Ball". The above arrangement is made with fresh roses and lemon leaf leaves for greens, but I also made it up in a silk sample. Here are the steps on how to assemble one for yourself.

Materials list:

1 Gala Bouquet Holder by FloraCraft (from craft store)
1 Bright Spot light (used white)
Aqua Gems (any color--I used purple)
48 fresh roses (as shown) or 24 silk roses
Ribbon
Green leaves for filler (for silks use green leaves from stems)

Directions:
  1. Carefully open bouquet holder at middle seam and remove floral foam (slide a dull knife around the middle if necessary)
  2. Using a butter knife or flathead screwdriver, remove plastic plug separating globe from bouquet handle
  3. Fill hollow handle with Aqua Gems
  4. Turn on Bright Spot and push up into the bottom of the floral foam (cut out foam material if necessary)
  5. Replace floral foam in holder with light shining down
  6. Snap holder back together
  7. Arrange flowers in floral foam so the edges touch and all foam is covered
  8. String ribbon through hole in bottom of holder to hang
Click here to visit the Aqua Gems website for more information
or to buy Aqua Gems Liquid Marbles
and BrightSPOT Submersible LED Accent Lights for this project


Disclosure: I was paid to design the featured project. I AM NOT being paid to feature this project or product(s) on my blog and WILL NOT receive compensation for clicks through to the company website featuring the product(s)

Friday, November 13, 2009

Lighted Carnation Parfait Centerpiece

Click on any image in this post to view larger


The past two weeks I've been working on a confidential design job that I can finally write about. I've been designing projects for Aqua-Gems using their products--Aqua Gems Liquid Marbles and BrightSPOT Submersible LED Accent Lights. A number of the design projects I've created will be used in a large retail craft/fabric store account that Aqua-Gems has, but I've been given the green light to showcase them on my blog too!

The first is a lighted centerpiece I've named "Carnation Parfait". Here are the steps on how to assembly one for yourself.

Materials list:

1 parfait or sundae glass (I got mine at a restaurant supply store)
1 drinking straw
1 BrightSPOT light (I used pink)
1 package of Aqua Gems Liquid Marbles (I used pink)
6 standard carnations in a color matching the Aqua Gems you use
2 white standard carnations
1 artificial red cherry or cranberry on a pick wire (from craft store)

Directions:

1) Turn on the BrightSPOT and slide the drinking straw over the bulb of the light (see photos below)


2) Place a small amount of hydrated Aqua Gems Liquid Marbles in bottom of parfait glass and nest BrightSPOT in Aqua Gems (see photo below)


3) Fill the parfait glass full of Aqua Gems Liquid Marbles

4) Position straw just to the right or left of center

5) Cut the carnation stems to 3-4 inches in length

6) Arrange 6 colored carnations in a circle around entire rim of parfait glass (let edges of carnations hang over the edge of glass)

7) Place 2 white carnations in top center (re-position straw if needed)

8) Place cherry on top by sliding pick wire down into center

And you're ready to "serve"!

Click here to visit the Aqua Gems website for more information
or to buy Aqua Gems Liquid Marbles
and BrightSPOT Submersible LED Accent Lights for this project


Disclosure: I was paid to design the featured project. I AM NOT being paid to feature this project or product(s) on my blog and WILL NOT receive compensation for clicks through to the company website featuring the product(s)

Thursday, November 5, 2009

One-of-a-Kind Vintage Doilie Corsages


I love wearing flower brooches on my retro-looking button-up sweaters. So I came up with a way to make flower corsage brooches from vintage doilies and mismatched or disassembled vintage jewelery. I've just released the first collection in the "One-of-a-Kind Wearable Art" section at the Dusting in Pearls online store.

Each of the vintage doilies are from my favorite local antique store with each one being unique and special. I found the vintage mismatched jewelery during my thrifting trips and thought they needed a new life as something special and pretty.

Click on any of the images in this post to see details and a larger image


Monday, November 2, 2009

Print-Your-Own Thanksgiving Invitations


Click on any of the images in this post to view larger

I've just released a new design for print-your-own Thanksgiving themed stationery that is very versatile and can be used in a lot of ways. There are some pretty cool reasons for buying a PDF digital file download:
  • You can print as many as you need for your personal use without any fancy software--all you need is a free downloaded copy of Adobe Reader
  • If you remember someone at the last minute, just print out another one
  • Once you've printed out the stationery, you can embellish it with glitter and lots of other fun things or just leave it as-is
  • You can use the same file for multiple uses such as invitations, map/directions inserts in the invitations, AND place cards
  • If you want to customize the stationery before you print it, you can do it easily by following the instructions below
Customizing Your Print-Your-Own Stationery

You can always print out the PDF file just as you receive it and then hand-write on the stationery. But if you want to save yourself time and turn the PDF file into your own customized invitations, this is how!

I used MS Word to do these (because most people have that program), but this can also be done using Photoshop Elements, Photoshop CS, or many other programs that allow you to insert or place a graphic into a document as an independent layer.

In MS Word, open a new document that is 8.5"x11" (letter-sized). Go up to the "Insert" menu at the top of your document so it expands like this...


Move your cursor down to the "Picture" sub-menu and hover over the right-facing arrow to the right of the title "Picture" to bring up the pull-down menu you'll need to insert a picture.


Within that sub-menu you'll have some choices. Choose "From File..." so you can navigate through your file directories to the PDF file that you've downloaded and stored on your hard drive. Once you've found the PDF file, select it and click OK.

The PDF file will now appear within your Word document as a graphic. It will probably be slightly smaller than its actual size, so you'll need to resize it larger.

To resize without distorting the correct proportions of a graphic, hold down the Shift key while dragging one of the corners of the graphic. Continue to drag until the graphic is as large as your document page.


The next step is really important.

Double-click on the graphic itself and define the "Wrapping Style" of the graphic as "Behind Text". What you are doing is telling the program that you want the graphic to act like a piece of paper behind what you are going to type. You want them to act independently of each other with the text sitting on top of the graphic.

Now go back to your "Insert" menu and select "Text box" to create a text box. Size the box to fit inside the graphics by dragging on any corner of the box, then start typing just as you would type a regular text-only document. Using a text box allows you to drag the entire block of text around on top of the other graphic as if the text is it's own editable graphic.


Once you've typed all the text that you need in the text box, select the text box (if it isn't already selected) by clicking on it once.

Now go to the "Edit" menu at the top of your document and select "Copy". An invisible copy of that text box will be copied to an invisible clipboard in your computer's memory.

Now go to the Edit menu again and select "Paste". A duplicate text box will appear in the center of your document. It will float on top of everything just like your other text box.

To drag and position it on the lower invitation graphic, click on top of the text and continue to hold down your mouse button without releasing. Then drag the text box into place.

Another way to reposition a text box or graphic is to make sure the object is selected and then use the direction arrows to maneuver it around your screen (this works well for finely adjusting a position).


Once you're happy with how everything lines up, it's time to print out your document.

Set your printer the highest quality print settings to get the best results. You can print on cardstock (Wal-Mart has some nice cardstock that's inexpensive) or on some other nice paper you have.

Print out as many copies as you need and you're set to begin embellishing and/or cutting them out! Easy!

Thursday, October 22, 2009

Print-Your-Own Halloween Invitations

Invite all your friends to a Halloween gathering with these sweet print-your-own invitations. Print as many as you wish (for your personal use) on your own printer, on the paper you want, and even embellish them to your heart's content!

Invitations are delivered in a digital PDF file that you print. When you purchase this item, a download file will be made available to you IMMEDIATELY after you checkout.

The PDF file prints on 8.5"x11" and has two flat postcard-style 7"W x 5"H invitations on each page you print. Once you've printed, simply cut around the dotted lines, fill out the invitation by hand, and send them out!

Each invitation will fit in a standard A7 envelope.


Friday, October 16, 2009

Behind the Scenes: Mum Dreams


I love to take macro shots (close-ups) of flowers. Sometimes the shot looks great just as it is, but sometimes I like to tweak it a bit to make it into an art photo. Here's a quick way that I do that.

I open the photo in Photoshop (I use CS3 but this will also work in Elements and other versions). The photo becomes the first layer in the file.

Using the "Place" command (under the "File" menu), I place a texture file as a new layer. In this case, I placed my texture "Lilac Dream". I then resize the texture layer so it completely covers the photo layer underneath it. It ends up looking like this:


The next step is to make the texture layer "transparent" so you can see the photo through it and get the effect of the texture mixed with the original photo.

In this case, with the texture layer selected I went to the "Layers" menu (in CS3 you can see it in the right hand side of your workspace) and in the pull-down menu under "Normal" I chose "Screen". It made the image look like this:


You can also experiment by choosing any of the options in the "Layers" menu to see if you like those effects better. Remember, "undo" is your friend. If you don't like the effect just "undo" and try something else. Nothing is permanent.

I liked the "Screen" effect for this texture and photo pairing. It worked very nicely. At this point, I could actually leave the photo the way it is, save it, and I'm done. But I like to tweak things a bit more after this step by accentuating certain elements in the photograph that only I can determine by hand.

First, I rasterize the texture layer so Photoshop allows me to edit it. Then, I select the eraser tool and set the opacity to 5-10%. I choose a soft-edged brush at about 45. Then with the texture layer selected, I start strategically erasing certain shadows around the center petals of the main mum. I use a digital tablet and stylus so it feels like I'm "drawing", but you can do the same thing with your mouse. Gentle strokes from the darkest shadows out toward the lighter areas mimic brush or pencil strokes. With the opacity set very low I only take away a little at bit at a time and feather out from the darker shadows. I only erase just a little here and there to draw out some of the detail in the focal points of the photo.

This is what the final product looks like:


Click here to download a free copy of this image to use as a desktop, wallpaper, or to print out at home

Friday, October 9, 2009

Behind the Scenes: Constance


I've had a sketch in my sketchbook for quite some time (I called her "Constance") but have been stumped as to how to finish the dress.

As I was playing with some textures yesterday, I ran across one that is the scan of the outside of a beautiful antique botanical print portfolio. I named the texture "Library Paisley". Then I started playing with it to see if I could get it to change colors, and my experiments worked! I got a great red version that I called "Library Paisley--Red" (along with some other cool color versions like peacock, violet blue, and kelly green.


Today, it dawned on me that it was the perfect pattern I had been waiting for to use as the dress for my "Constance". I cleaned up the line drawing and elongated her legs in the process. Then I used the "linear burn" method that I wrote about in the "Downward Dog" post.

To apply the pattern to her dress, I used the masking technique in Photoshop straight from my copy of Photoshop CS3 Classroom in a Book (I couldn't have done it without my book because for some reason I have a mental block when using masks and it isn't intuitive for me). The cool thing about using a mask layer is that I can change the dress to be any other pattern I want with just a few clicks.

Then I set my brush on "Watercolor Heavy Pigments" and went to work adding color to the drawing that would coordinate with the dress.

Finally, I put the fully colored "Constance" onto a background of a scanned piece of old sheet music with the opacity dialed way down. I added type with the font Jellyka Saint Andrew's Queen (free at dafont.com) and skewed it to make it look like an autographed "photo".

Here is the final art (click on the image to view larger):


Wednesday, October 7, 2009

Bellhop

Click on image to view larger


I felt like "playing" today with one of my sketches that I've had in my sketchbook for quite some time. I brought the bellhop pencil sketch into Photoshop for the digital coloring using the same technique I did for "Downward Dog". Once the bellhop was done, I put him into a composition using one of my own photographs, a couple of my textures, and a fun new font I found at dafont.com.

Font: Fontdinerdotcom Sparkly
Textures: Autumn Haze and an old paper texture I scanned in (if you want it ask me)
Photo: Vintage Sierra Motel Sign

Monday, October 5, 2009

Behind the Scenes: The Beaded Chick

The past couple of weeks, I've had the immense pleasure of doing a design job for Kimberly over at The Beaded Chick. She contacted me after seeing my work at the Rosehaven Cottage Digital Download Shop. She needed a custom-designed logo for her sterling silver and Swarovski crystal jewelry business and wondered if I could create one for her.

Since Kimberly and I live on separate coasts of the U.S., all our communications were via email (and Flickr). Kimberly gave me a wonderful description of what her vision for the logo was. My job was to interpret it into a little chick that she would love. So the first thing I needed to do was some pencil sketching. This is the pencil sketch that I started out with...

I scanned the pencil sketch into the computer and opened it in Adobe Illustrator CS3 to do the "inking" (back in school I really used pen and ink for this step). I use Illustrator because it will create a vector graphic that will resize to any size without losing quality (no pixelated and jagged edges). I like to used a brush set on "charcoal" at various stroke widths to get the art marker look I like.

After the initial pencil sketch, Kimberly communicated an additional piece of her vision--that the little chick would be wearing a ring and a bracelet. So with those additions, the finished "inking" ended up looking like this...

Then it was time to add some color. At this point, I switched over to Adobe Photoshop CS3 and placed the image into a Photoshop document (Illustrator files are compatible with Photoshop). Then I started creating layer after layer of color by "drawing" the color on using my digital tablet and a stylus. Every time I changed colors, I made a new layer (in case I wanted to make any adjustments along the way). The "inking" layer always stayed as the top layer over the colors. Doing this part is always a lot of fun and feels like coloring in a coloring book to me.

When I was done, I had this...


Once I had the little chick completed, I was also able to design Kimberly's blog header for her. Kimberly hadn't settled on any font type yet, so I hunted around over at dafont.com to find a free font that would convey a jeweled or beaded quality. I found Razzle Dazzle and knew it was the perfect fit! I already had MA Sexy for the pretty hot pink cursive writing. Using Kimberly's blog template as a color guide, I built the header to match her beautiful color palette. And this is what the finished header looks like...


Hubby loves the little "Beaded Chick". And I have to humbly admit that I do too and it's all because of Kimberly vision. Thank you, Kimberly, for this wonderful opportunity to create her for you! I am excited to see her write about her own creative journey on "The Beaded Chick" blog.

All bold words in this post are click-able links

Saturday, September 26, 2009

Uncharted waters ahead


Because the summer heat around here is so oppressive, I spend the summer months indoors staying cool with the air conditioner. It isn't until sometime in October that I venture back out into the garden for the next 8-9 months until the heat drives me back inside again. So during the summer months, I do an awful lot of soul-searching and pondering. I do a lot of pondering while I garden the rest of the year, but it is often a different kind of pondering that is more spiritual in nature. My summer pondering is that of a woman in "hibernation" and often has a "cocoon effect" on me so that by the end of summer I'm ready to burst forth like a butterfly ready to take wing.

This summer, I've done a great deal of soul-searching and self-evaluation during my months of hibernation. And in counsel with my best friend (who is also my sweet spouse), I felt brave enough to take a step into uncharted waters in my creative journey. So I applied to the Academy of Art University in San Francisco to the Master of Fine Arts program in Illustration. A large part of me expected to not get in, but I knew I needed to at least go through the process of taking the risk.


My creative journey has been a circuitous one. I've been creating with a pencil in my hand since I was old enough to hold one (my mom has the home movies to prove it). Through some wonderful serendipitous circumstances, I was able to attend a public school in first grade that had an art program with a dedicated art teacher who taught her students (me included) how to draw still life at age 7! Now that I reflect back on it, I realize was an amazing and rare experience that was. As I got older, I plugged along through various public schools (we moved frequently during my childhood). By junior high and high school I was choosing to take art as an elective no matter what. I learned sculpture, pottery, drawing, painting, and just about every other medium you can imagine.

After high school, I dabbled in a few college majors before settling on Commercial Art and earned my Associates of Arts degree at a community college. I walked out of that program with the training to be a graphic artist and the portfolio to prove it. I went to interview after interview for creative positions. But no jobs materialized. My dream had been to work for Disney, so I even trekked down to L.A. for a couple of months trying to get a job there. It didn't happen. It seemed I was not destined to be a professional graphic artist. I ended up working in secretarial and data entry capacities in order to earn money (good thing my mom had strongly encouraged me to take typing and 10-key in high school).

After a few unfulfilling years working in administrative jobs, I decided to go back to school and earn my Bachelor's degree. I was drawn to Mills College and ended up in their Art History program. My two years there were an awakening for me as a 26-28 year old woman. I gained a lot of confidence and self-assurance there. I did a lot of writing for Art History and enjoyed it immensely. My professors said I showed promise and hoped that I would go on to get my graduate degrees in Art History as well. But I didn't. I had to go back into the workforce and earn money again.


"Corporate America" was a bit kinder to me after I had my Bachelor's degree. I was able to get work in project administration capacities. I tried to carve out "creative" niches in my work as a technical writer and computer trainer. I was always the one that got to do the office newsletters and flyers.

But my "real" art still remained in a portfolio and in a secret place in my heart. My creativity found outlets in the privacy of my own home. I never earned a living creating art. And it always seemed like a very sad disappointment that I felt I needed to hide. Sometimes I'd get brave and send a set of slides to a greeting card publisher. I even invested in having some cards printed up professionally but couldn't sell them to retailers. I let my inner artist slowly go to sleep in a place deep inside me.

I got married when I was 31 years old. Within months of getting married, my physical health deteriorated rapidly. I had been burdened with chronic pain since I was 15 years old, but no doctor was able to diagnose anything other than PMS. By the time I was 31, I became completely incapacitated. So my husband became the soul breadwinner in our home. I stayed home and thought it was a good opportunity to try to get creative again. I tried my hand at cross-stitching. Once (at the prompting of my brother when he gave me a beautiful wooden easel as a gift) I brought out my paints and a canvas and painted one painting. I gave away most of my art supplies to my brother who was in art classes at the time. I figured I was passing the torch on for good. All my creative pursuits were limited and very "safe" like embroidery and sewing. I couldn't venture to the place where I had taken risks a decade before. That was too scary.

A couple of years after I got married, we bought our house and I delved into the adventures of remodeling and renovation. My creativity found an outlet in home construction as I tiled, sheet-rocked, taped, textured, laid hardwood floors, and installed trim. It also found an outlet in the garden as I took our dried up lot and made it bloom into a drought-tolerant cottage-style garden.

After a few years of working on the house despite my chronic pain, I finally found a doctor that listened. A month after my 39th birthday, I underwent the surgery that revealed I had been plagued with a crippling case of endometriosis for over 20 years. I was given my life back. For me, life really did begin at 40. I spent the next 1-2 years healing my physical body. But my inner artist was still fast asleep.


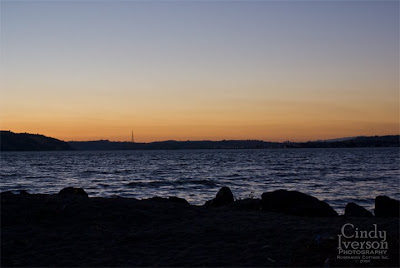
It wasn't until the spring of 2007 on a vacation, when I started shooting photos on the beach that I realized there was a creative artist in me that, like Sleeping Beauty, was ready to wake up. However, because I have to allow myself to be slightly vulnerable when I create, I had to take things slowly and ease into it again. The more involved the creative method is (like painting), the more vulnerable I have to be to create. I had to take baby steps. I couldn't just jump back in with both feet. It was too scary.

First, I ventured into photography again because that was the safest place to start. I could shoot what I saw. With a digital camera, I didn't even have to worry about wasting film. If a shot didn't turn out, I hadn't taken a huge creative risk. I could just delete the image. I started dabbling in some post-processing techniques using Photoshop to get a little more creative with the photographs. But things still remained pretty safe. And it helped that I shot a lot of my images in my gardens and places that I loved.

Then after about a year of that, I started playing with some digitally produced art. I doodled using my computer and a newly acquired digital tablet. Creating that way was pretty safe too, because I could always hit "undo" or erase something. Nothing was really permanent.

I did that for a while, until I felt safe enough to get my sketchbooks back out and started sketching in them. One sketchbook hadn't been touched in over 10 years. This step was pretty hard. I found myself wanting to make every sketch be perfect. Sometimes, I would find myself paralyzed and unable to sketch anything because of the fear of sketching something wrong and not creating a "masterpiece" every time. It was very hard to make myself take risks in that sketchbook (it still is).

I also invested in a new set of watercolors (my original tubes from 20 years ago had dried up). I brought out my unused watercolor paper from 15 years before and started painting in watercolors again. I successfully took that step into a more vulnerable place.


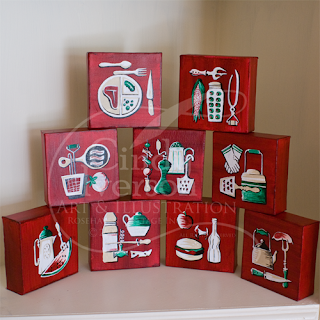
Then my father-in-law passed away in April 2009. In his spare time, Dad was a very talented painter in acrylics and oils. After the funeral, my mother-in-law gave me all Dad's blank canvases, his vast collection of exquisite brushes, and his entire set of paints. I drove home with a mini art supply store in the back of our vehicle. I let the canvases sit for a couple of days, but they kept "calling out to me". In the midst of my grief, I knew Dad wanted me to paint something with everything I'd been given. I brushed the dust off that wooden easel my brother had given me 10 years before (it still looked brand new), and I made myself put a paint-laden brush to canvas. That was really hard. I couldn't hit the "undo" command when I was painting. It was just me, the brush, the acrylic paint and the canvas... and Dad, who I could feel quietly prodding me on. But once I got into the groove, boy, did it feel good.


Every step of the way, I felt myself getting closer to my artistic core--the place where I had to be willing to be vulnerable in order to create.

At the same time as I was taking up painting again, I also started taking floral design classes at our local adult education center. I am an introvert with some social anxiety, so going back into a classroom setting again with strangers was a huge step for me in my creative journey. I had to learn all over again how to allow my creative work to be critiqued; how to create in the midst of others observing my creative process; and how to make mistakes in front of an instructor and classmates. It was hard at first. But I persevered and can honestly say that I welcome those aspects of the creative process now. I actually thrive off of it.

It seemed inevitable that my next step would be to revisit the idea of pursuing my graduate degree after I had put that goal on hold for 15 years. I chose the Academy of Art University in San Francisco mainly because of it's online degree programs. Only a few years ago, the idea of being able to get an MFA in Illustration completely online was unheard of, and now the Academy of Art University is the pioneer in making it happen so an artist can earn an art degree and live anywhere in the world.

After I sent in my application, I braced myself for rejection, because rejection is what I've known when it came to the art that came from my core.

To my pleasant surprise, I received my acceptance letter to the Master of Fine Arts in Illustration last week! I will start the program the Summer semester of 2010 (just after I've completed my floral design certification program). This past week has been a week of letting it really sink in that this is real. The artist in me is finally fully awake again.

And now I'm taking a maiden voyage on uncharted waters. I hope you'll join me as I do. I'll continue to chronicle my artistic journey here at the Dusting in Pearls blog. And I hope that somehow as I share, my experiences will benefit someone that needs to awake their inner Sleeping Beauty as I did.

Friday, September 25, 2009

Behind the Scenes: Autumnal Bouquet


For this post, I thought it would be fun to share how I go about digitally altering a photograph to make it look like a chalk or pastel drawing like "Autumnal Bouquet" (above).


The first thing I do is find a promising photograph that I've taken of a flower arrangement. I find that the best floral photos are taken in indirect natural light. That means that if the object I'm shooting is being lit by sun come in a nearby window without directly shining on the object, it'll be great lighting. I like to use auto-focus when I shoot so that I get a crisp focus. I aim at the central object in the arrangement (in this case the yellow mum) and then shoot. I take multiple shots just to be sure I've gotten one really good sharp shot.

After I take it back to my computer and bring it into Photoshop (I use CS3, but Photoshop Elements will work too), I make the photograph the first layer in a file.

Then I use the "Place" command to place a texture from a separate file into my current file as a new layer. In this instance, I used my own texture "Toasted Marshmallow".


I enlarge the texture so that it covers the original photo layer completely (don't worry, the other layer is just underneath like one piece of paper on top of another). Then with the new texture layer selected I go to my "Layers" menu and select "Screen". Then I reduce the opacity of the texture layer to 60%. And it looks like this:


Next, I use the "Place" command again to add another texture layer. This time it's my own texture "Autumn Haze".


I rotate and resize the texture so it covers the other two beneath it completely. Then I select the texture layer and reduce the opacity to 70% so it looks like this:

See how it's starting to look like a faint drawing? At this point, with the top texture still selected, I change to the eraser tool and choose a soft edged brush at 10% opacity. Using my digital tablet and stylus (you can do it with a mouse too although it's easier with the tablet and stylus). I "draw" on the edges of the petals to erase away the edges where the light highlights them. I erase away in shadows too. I change the size of my eraser depending on the detail I'm erasing. For the petals, I use a small eraser and for the background I use a large eraser.

Then if I want to enhance some of the shadows and highlights even more, I select the original photograph layer and with the dodge and burn tool set at 10%, I "draw" over a few of the highlights and shadows to really accentuate them as if I was going in with white or dark chalk and deepening those areas.

And the final result looks like this:


IMPORTANT "PEARLY" NOTE: If you are using Internet Explorer, you aren't having the most beautiful "pearly" experience that you could have if you were viewing this site with Mozilla Firefox for the PC or Firefox for the Mac which is available for FREE download at the above links.